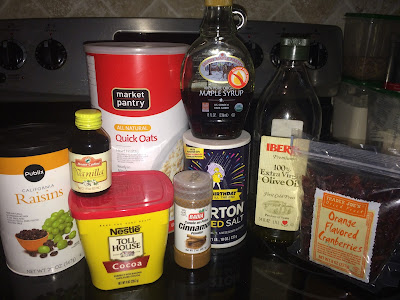
Let me present you a great and fast weekend project that basically qualifies as a workday project too, because it is so simple and easy to do. I saw a recipe on The Beautiful Mess blog the other week and decided to give it a try. I changed a couple of things to personalize it for my own taste. Here are the ingredients with my changes:
-2-3 cups of rolled, dried oatmeal
- 1/3 cup of olive oil
- pinch of salt
-2-3 spoons of cocoa powder
-1 spoon of vanilla
- 1 spoon of cinnamon
- 1/3 cup of honey or maple syrup
- any dried fruit or nuts
(rolled oatmeal, cocoa powder, olive oil, maple syrup or honey, vanilla, cinnamon, salt and any dried fruit)
I decided to try a little hack with coconut flakes. They are usually pretty moist and contain a decent amount of water. However, you can put it in a pan, toast it and get a totally different, new texture and taste.
Make sure you use only low heat and you stir the flakes constantly as they are very delicate and tend to burn very easily. I am sure you will love the great coconut smell in your kitchen. I used the toasted coconut flakes in banana bread and it resulted in a very nice, flaky texture and of course, great coconut flavor too.
Important: I put the toasted coconut in the granola after I baked the granola. Don`t bake the toasted coconut as it will burn and taste really bad.
So after you prepared all your ingredients, you just need to measure them and mix the dry, then the wet ingredients. I usually mix them with hand as all the wet ingredients (mostly the rolled oats) need to get covered well. Preheat your oven to 350F or 180 Celsius and use a big tray for your oven and spread the moist, paste-like oats in it in a relatively even layer. Bake it for approximately 5-10 minutes (you will smell it after a couple of minutes) and then get the tray out of the oven and mix the half-baked oats once again so all of them bakes evenly and the bottom layer doesn`t get burned. Keep an eye on the oven, don`t have to bake it for more than a good 10 minutes.
I am not a big fan of the chia seed texture when you put them in some liquid, but I love using it in the freshly baked granola mix. Make sure that your granola is cooled down before you mix a couple of tablespoons of chia seeds for the health of your heart and circulation.
So these jars filled with granola are the end result. So much nicer than the store bought version and great as a gift for the upcoming holidays. I honestly eat it at lest 4-5 times a week for breakfast. I used dried cranberries, dried raisins, chopped dates as additional nutrition, flavor and texture. Don`t worry if you don`t have maple syrup, you can use agave or pure honey to sweeten it. Also, I put the dried fruits in the oven to bake but you can add the fruits after the granola is baked, just depends on your taste. You can serve the granola with milk, yogurt, on top of sweets and pies. Good luck, have fun and enjoy!


